We are a christian homeschooling family of 4, living the farm life in north central Alabama. rWe are trying to live as simply and purposely as possible. Follow along as we pilgrim along this wonderful life!
Showing posts with label Do It Yourself. Show all posts

Tuesday, July 16, 2013

Butchering Chickens

This year we raised a meat breed chicken for the first time. We have had chickens for years, but only egg layers. We have butchered a few here and there, but this time we had several to do at one time.

We don't have any fancy equipment or stainless steel tables as you will see from our pictures. Unless you are doing this all the time, I don't see why you would need an elaborate set up. Of course this needs to be an outside job. It did get messy. This is what we did.


We wanted our finished chicken to have the skin left on, so to remove all those feathers and to make plucking it easier, you have to dip it in water heated to make the feathers break loose.

We used our outdoor marshmallow roasting fire pit to heat our water. I don't have a turkey fryer so I had to come up with something to suit our needs. I stacked rocks up, then used our gas grill grate to sit my pan on. It worked really well. The pan I used is a large water bath canner I rarely use. After this, I probably won't use it again inside. The fire charred it pretty good, so I will set it aside to only use for this purpose later.

We set up in our yard, at the edge of the woods. I used old saw horses and put a board on them for a make shift table. You can see the killing cone hanging on the tree in the back of the picture. It's a little too big for the chickens we were butchering this day, but it worked.
 
 
We started the actual kill when the water reached the correct temperature of around 150 degrees. We researched that the temp should be between 130 and 180. Actually 130 is not hot enough, as we found out. The feathers didn't come out well. 150 seemed to work perfectly though.


I did not get any pictures of the actual killing of the chicken. (sorry..... I know you were wanting to see that!) You simply place the chicken in the cone upside down, cut on each side of the neck and let it bleed out. After it was thoroughly bled out, I went ahead and cut the head off. I collected the blood in a bucket under the cone to be used for my apple trees. In this picture is the "dipping" of the chicken. We just hold by the legs and dip and swirl it around in the water. After about 30 seconds to one minute, the feathers will start coming out easy, then you know it's ready for plucking.


We worked fast, starting with the tail feathers then the wings. Those are the toughest feathers and we wanted to make sure we got those done first, before the bird cooled off. We did this part over newspaper so it will be easy clean up. We used new paper with each one.


After all those feathers were disposed of, we got out the cutting board and started the evisceration. Here Hailey is cutting off the oil gland. That goes first, because you don't want that to contaminate your meat.


Next is the crop. These birds didn't get there morning feed, but did free range, so there wasn't much in there.
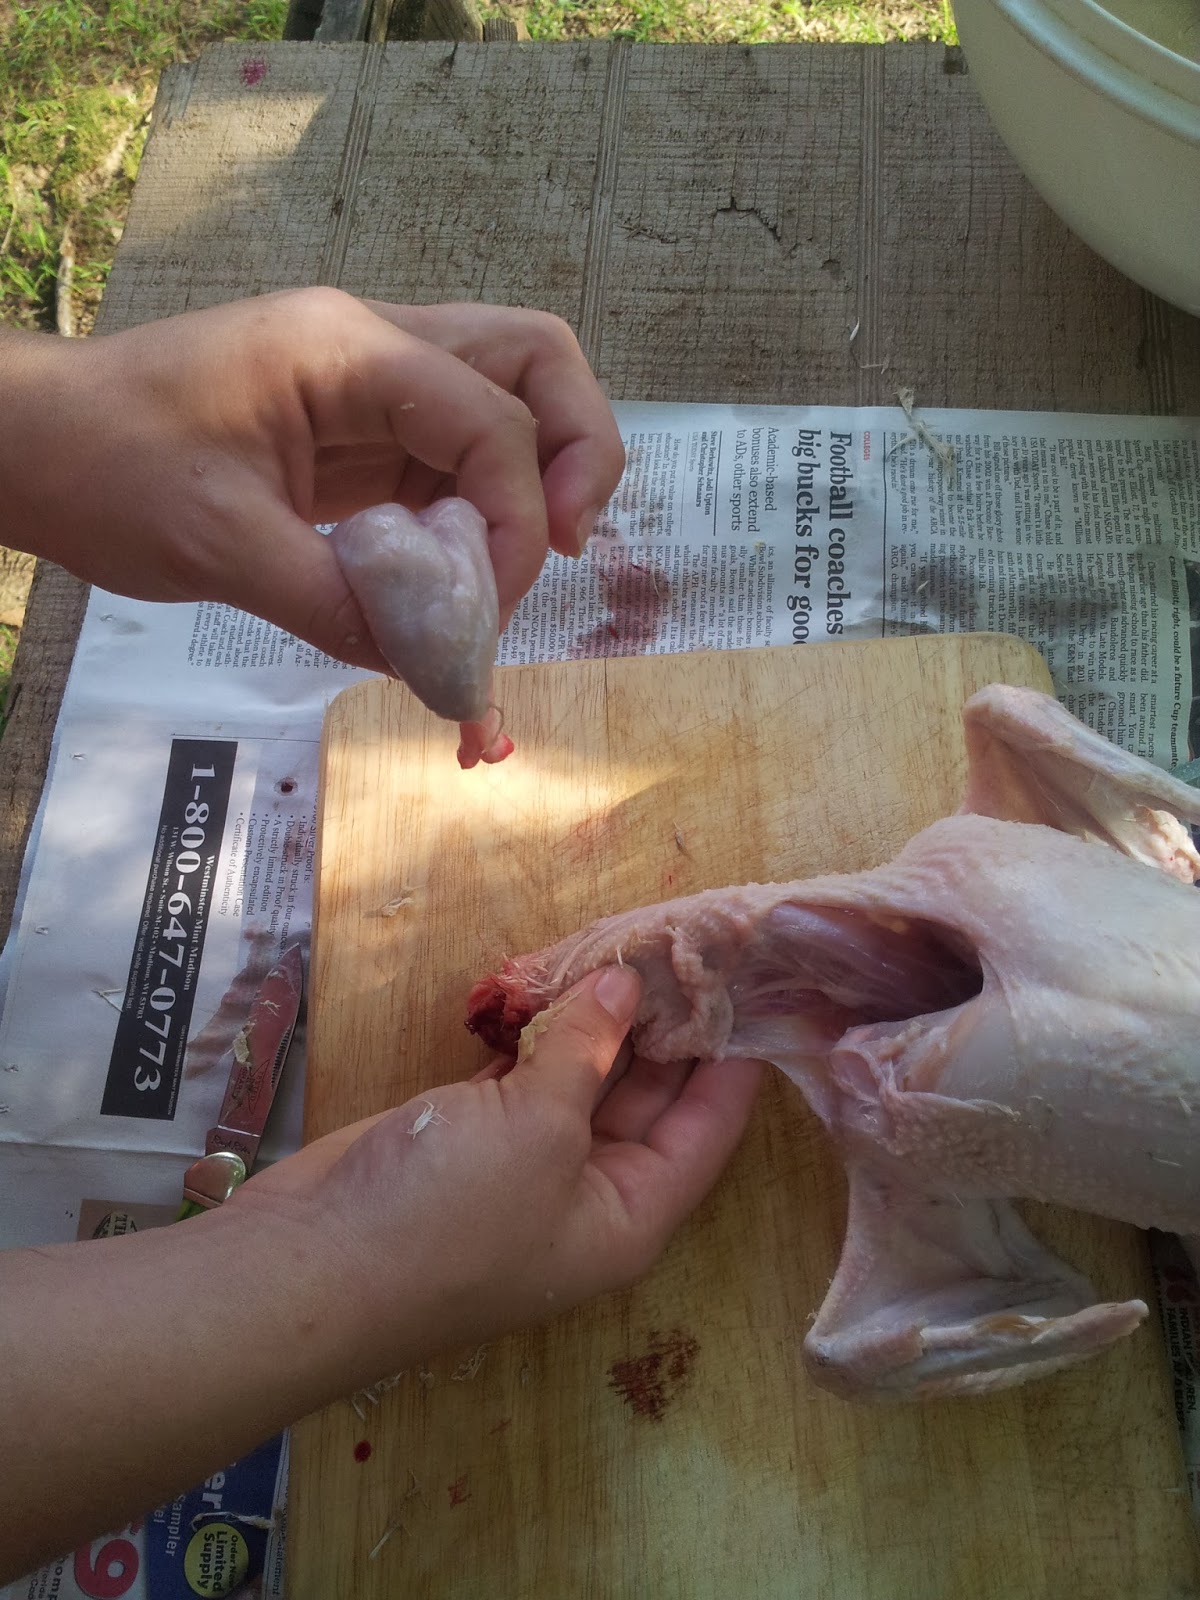


Then we cut a small slice in the skin at the bottom, then tore the skin apart. At this point, we reached inside with our hand and grabbed the, uh, all that stuff and put it in the evisceration bucket. We made sure we got everything out, especially the lungs. They can be hard to get out sometimes. It really wasn't messy or bloody at all.
 
 
The last thing is the feet. We just cut those off at the joint. With a sharp knife, you can slice right through.

 
The finished bird! I can't tell you how much it weighed because I don't have any scales, but I assume it weighs 2 1/2 -3 pounds. Somewhat small, but big enough. I cooked this bird that night. We had plenty with 2 pieces left over and it was very good! It wasn't a large bird with grotesque breasts and pumped full of steroids. This bird got to be a chicken. It free- ranged everyday, ate grass and was happy!
 
We kept the liver, heart and neck to be added to wonderful, homemade chicken stock. I also kept the feet because they make a wonderful broth also. I will detail that out in a different post.
 
We put 10 birds in the freezer for our future use with still more to butcher out. It makes me feel good  that we raised these chickens up from day old chicks, kept them healthy and happy, and was able to do it all ourselves.


Blessings,
Melissa


Friday, July 12, 2013

Blueberry jam


One of the easiest things to preserve in the summer is fruit.  All you really need is your fruit of choice and sugar. I never put pectin in my jam to make it thicker. I really feel it is a waste of money for jam. We like a runny jam, very spreadable, that's good on biscuits, pancakes or just about anything!
 
 
First, take your berries and wash them well. After a good rinse, place the berries in a large pot. You want to make sure your pot is large because you will be boiling the mixture and you don't want it to splatter out on you or your stove.


Pour all the berries in the pot, place over high heat and start the cooking process.  At the same time, I get the water bath canner going. You want the water really hot in the canner. Place it on high heat and put the lid on. Hopefully, it will get to boiling about the same time you will place your jars in it.

You can add a little water to the berries, to keep them from sticking if needed.  As soon as they start getting soupy, I start adding sugar. I add 2 cups to start.


Then, I start tasting. I keep adding sugar, one cup at a time, until it is as sweet as I like. With this batch, I added about 5 cups of sugar. I used about one gallon of berries. 
 
Your mixture should be boiling and you should be stirring. :)
 
 
You will start noticing foam forming along the top. Try to skim most of that off. A ladle works well for this. I don't worry too much if I don't get every bit off.
Let it cook until it starts getting thicker. This may take anywhere from 15 minutes to 30 minutes. Just remember that the finished product will be thicker, so you will have to judge for yourselves when it looks good to you.
 
When it finally gets exactly like you want it, it's time to fill the jars!
 
 
Fill each jar, leaving about 1 inch headspace.
 
 
Make sure you wipe the top of each jar with a clean, damp cloth. If you don't, it could prevent the lid from sealing.
 
 
Place a hot lid on top and secure with band. I keep my lids hot in a small pan of water on the back of the stove. If you haven't got a lid grabber like the one shown, GET YOU ONE! SOON! No more burning fingers. :) I do believe it is one of the most greatest of inventions.


Using your jar grabber, place in your canner very carefully. In the picture you may notice a towel. I placed it on the bottom to keep my jars from sitting right on the bottom. It works great. I do have an insert, but I thought I might have more jars than what would fit in it.
 
 
After all the jars are in the canner, bring back to boiling and boil 10 minutes. Use your jar grabber to remove the jars after the required time. They are hot so don't burn yourself. Place on a towel out of the way so they won't be disturbed for 24 hours.


The end product. Something wonderful made with a little time and effort! Canning and preserving is hard work, but is one of the most satisfying things a wife can do for her family. Especially when winter is upon us. There's nothing quite like opening a jar of "summer" in the freezing cold!
 
 
Happy canning!
\Melissa


Tuesday, February 26, 2013

Odds N Ends.....

It's been a little while so I thought I would drop in.

Right now I am sick in bed with a terrible cold. Brad came home with it Thursday night and was sick over the weekend, and now I have it in full swing. I don't like being sick at all!

We have been caring for a calf that had gotten down at my father in laws farm. We brought it here and it was getting better, but now it seems we have done all we can for it. I just don't think it's going to make it, poor thing. Last week, I called the vet and he fixed up several syringes of meds to give it. He told me that if it didn't get better after this, there probably won't be anything left to do for it. I guess he was right. Brad and I went out this morning to get her up and she just doesn't have any more strength to stand anymore. I pulled muscles in both arms heaving her up, and I just can't do it anymore. We have had to pull her up everyday for a week. I was hoping she would pull through and make a nice addition to the farm.

Hailey has a new blog called Handmade by Hailey Bug. She has a couple of orders so far. She loves to crochet and does very good work. She decided to start this business after deciding not to attend college. She is a stay-at-home daughter and is still learning the art of being a Godly housewife. She is going to make someone special a very good wife and helpmeet one day. I will probably write more on this beautiful alternative to college in a later post!

Brody is .....well, Brody! I am pretty sure all he has on his mind is dirt bikes and it's all Brad's fault! :)
Some days, I can't believe we get anything done with all his plans and daydreams. He is very good at riding his dirt bike and doing jumps, tricks and wheelies. He is all boy, full steam ahead, every day the moment he wakes up, and has been that way since birth!
Last week, he told me he wanted to be a veternarian. I thought that was brilliant until I asked him to go help me with the cow. He does not like to be around sick animals. I asked him how he was going to be a vet, when he didn't want to help me EVER with the animals! He said that he was going to hire it done, and let them do all the work and he would over-see. Kids, they just don't understand.......

I have a Kombucha scoby growing that I am excited about! It should be ready in about 1-2 more weeks. I grew it myself from a bottle of kombucha from EarthFare. It had a tiny scoby in it.  After a little research on "growing your own kombucha scoby", I got it going and it is growing!! I will have a full post on this later. If you don't know what kombucha is, do a little investigating. It is fermented tea that is very good for you! I used to drink it a long time ago. I brewed again in 2010, and got sick. I still don't know if it was a virus, or the tea, but I was in PAIN! Every bone in my body hurt, from what I believe might have been lactic acid build up. I have drank several bottles of it lately from EarthFare with no ill effects. In fact, my body is wanting more. I am craving it, which leads me to believe I really need it right now. Our bodies sure have a way of letting us know when we need things, doesn't it?  I am looking forward to enjoying a cup of my tea soon!

I started a few seeds this morning before I got confined to the bed! Yesterday afternoon, I sterilized soil so I could bring it inside without all the nasty things growing and killing my seedlings.
YES, I know you can go pick up a bag of soil in the stores for a couple of bucks.
I asked Brad to pick me up a bag of organic potting soil and he came back without one saying,"all that's in it is dirt and manure and we have plenty of that stuff."
Why yes we do!
He just didn't realize that the stuff in the stores are sterilized. You can't just get dirt from outside and bring it INSIDE and it work out. You could have all kinds of creepy things growing in no time at all!
So, I spent the afternoon outside building me a fire and cooking dirt and you know what?
I kinda enjoyed it.
It wasn't so bad. This is some of the best dirt around after years and years of leaves rotting on it and now it's even better after being "cooked"!

Saturday, I put 41 chicken eggs in the incubator. I can't wait to see what hatches out. I put one of Mabels eggs in there, but I'm not sure its fertile. Mabel is a Top Hat Polish. She is my favorite out of the bunch. Very curious, happy and comical. She keeps us laughing! I put several of my eggs from my bunch and several from a farmer I get free-range eggs from. I always get a few Dominiques out of his and I would love to add some to my flock.

I am looking forward to Spring! Lovely, beautiful, birds-a-singing SPRING!

Blessings,
Melissa

Tuesday, February 5, 2013

Homemade Potpourri

In the winter time, I like to dry all kinds of things for my own homemade potpourri. I use the rinds of oranges, corncobs and many things outside that can be brought in, dried and added. I use dried herbs, flower heads, cloves and pinecones to name a few. You can use just about anything and the more natural it is, the better.

 After we eat corn on the cob, I take each piece and wash it good, then place under my wood stove for drying. I think it's a perfectly good use for something that would otherwise get thrown out.

When you gather everything you would like to add to your potpourri, the next step is drying. I use our wood heater. It doesn't take long at all to dry most things this way. Sometimes just a day. You can also use a paper bag. I dry lots of herbs in the summer time this way. Just place your goodies in the bag without overcrowding, fold down the top, secure with a clip or clothespin and place in a sunny window. It takes several days to a few weeks this way, but it does work. You want whatever you use to be dried to keep it looking good and also for bacteria. If it's not dry, you may have mold growing on your orange rind before long.

Once you have everything dried, it's time to add the most special part. The scent! During winter, I like to use cinnamon or clove, or both! In summer, I like a flowery scent like jasmine or lavender. I use pure essential oils for my scents. In my "slightly advanced age", I have become very sensitive to perfumes and synthetic fragrances. Essential oils are natural and usually will not leave me with a pounding headache like that other stuff does. It's not hard to find EO's. Natural health stores carry a wide range of different scents and of course stores online will have any scent you may want. They can be a little expensive, but will last a very long time because a little goes a LONG way!


Take all your potpourri and add to a plastic ziplock bag. Add your drops of scents, seal the bag and shake well. Add several drops of EO.  Leave for a few days. This will dry further and seal in your scent. Now add to your potpourri jar and finish with a pretty bow or raffia. Ta da! You have your very own special potpourri

Very "country" potpourri!


I placed mine in my bathroom. It smells like cinnnamon and cloves and is lovely.

Have fun making your own potpourri!

Blessings,
Melissa

Ps. I promise to add pics soon. I am having technical issues..... :)


Sunday, November 25, 2012

Apple Scrap Vinegar

We use a lot of vinegar. Or, I should say me..... I use a lot of it and I'm always looking for ways to save money. I love Braggs raw vinegar with the mother, but it's a little pricey, even through the food co-op. I also use store brand vinegar for cleaning and such~ the "non-important" things. I love using vinegar in the No-Poo method of shampooing which I've been doing for a while now. I have almost waist length hair, so it takes a lot!
After visiting my local apple orchard this fall, and buying a bushel for all kinds of good things (like fried apple pies!)-- I remembered something about using apple scraps to make vinegar. So, after a little research, I decided to dive into my own brewing.

Take your apple scraps and place them in a food-grade or large glass container about 3/4 full. (It doesn't matter what kind of apples you use. It can even be mixed.) I used a gallon glass container and several 1/2 gallon glass containers because I had a lot of scraps. I didn't have anything large enough to hold them all at the same time! Keep your glass pickle jars for uses such as these! I don't think it much matters about the shape and size, as long as it's safe to use. I try to always use glass for projects because they can be sterilized and they are not porous to hold in bad germs or bacteria.

Now for the sugar/water mixture. Use 1/4 cup regular sugar to 1 quart of purified or filtered water. You can use honey, but it may take a while longer to ferment into vinegar from what I've read. I used regular sugar and it seems to be doing fine. Dissolve the sugar in the water and pour over your apple scraps. Make up enough sugar water to cover your scraps and cover each jar with cheesecloth or a towel. Secure with rubber band. You don't want fruit flies or other flying creatures to ruin your product. I love to use old pillow cases for a covering over the jar and straining. They can be found cheap at thrift stores- much cheaper than cheesecloth- and they are much stronger and allow your projects to breathe. They can be cut up to the perfect size you need for any project.


Covered and fermenting!


This is how it looked after 2 weeks.


Over time, your scraps will start bubbling~~ fermentation!!!! Stir every day or even several times a day. You will need to do this because the scraps will float to the top and they need to be submerged. This keeps everything mixed up well and keeps mold from growing. If you ever see black mold growing, discard and start over! I didn't have that problem with mine. You need to keep your containers in a temp of about 70 degrees. It just doesn't need to get too hot because mold will start growing. If it's too cold, it just slows fermentation.

 
After a few days, take a taste test. Be brave! It's not quite vinegar, but it sure isn't sugar water anymore!

Straining the vinegar.
 
 I have read to leave your vinegar brewing for 2 days or for 4-6 months! This varies widely!!! I left mine 2 weeks. At that point, the bubbling slowed and it just looked like it was done. I strained them, rinsed my jars out well and filled them back up with my strained vinegar. A few days after straining, the mother appeared! I GREW A MOTHER!!! You can too!


The Mother..... gross isn't it?
What is a mother? It is an acidic strain of acetobactor bacteria that when combined with oxygen, (hence the reason your container needs to breathe) causes fermentation. It has a jelly like appearence and is quite gross looking.


I am at this point with my own vinegar making. Even though I strained my scraps, it is still fermenting. I will leave them covered with my pillow cases and rubber bands for several more weeks. Possibly months. I will taste every few days until it tastes like vinegar. Then I will bottle up and store.

Strained vinegar.

I do have to say that when you make vinegar, it can be quite odorous! At first maybe a family member may ask, "What is that funny smell?" You may want to tell the whole family your intentions so everyone is well prepared for the odor that will linger. After straining, I did notice the odor got better.

I encourage you to do your own research on this wonderful," I-can-make-this-at-home" product. It makes a great homeschool project too! Try using different fruit. Maybe throw in some cranberries. Maybe lemons?
Next time, I'm going to be a little adventurous!

Blessings to you,
Melissa