We are a christian homeschooling family of 4, living the farm life in north central Alabama. rWe are trying to live as simply and purposely as possible. Follow along as we pilgrim along this wonderful life!

Tuesday, July 16, 2013

Butchering Chickens

This year we raised a meat breed chicken for the first time. We have had chickens for years, but only egg layers. We have butchered a few here and there, but this time we had several to do at one time.

We don't have any fancy equipment or stainless steel tables as you will see from our pictures. Unless you are doing this all the time, I don't see why you would need an elaborate set up. Of course this needs to be an outside job. It did get messy. This is what we did.


We wanted our finished chicken to have the skin left on, so to remove all those feathers and to make plucking it easier, you have to dip it in water heated to make the feathers break loose.

We used our outdoor marshmallow roasting fire pit to heat our water. I don't have a turkey fryer so I had to come up with something to suit our needs. I stacked rocks up, then used our gas grill grate to sit my pan on. It worked really well. The pan I used is a large water bath canner I rarely use. After this, I probably won't use it again inside. The fire charred it pretty good, so I will set it aside to only use for this purpose later.

We set up in our yard, at the edge of the woods. I used old saw horses and put a board on them for a make shift table. You can see the killing cone hanging on the tree in the back of the picture. It's a little too big for the chickens we were butchering this day, but it worked.
 
 
We started the actual kill when the water reached the correct temperature of around 150 degrees. We researched that the temp should be between 130 and 180. Actually 130 is not hot enough, as we found out. The feathers didn't come out well. 150 seemed to work perfectly though.


I did not get any pictures of the actual killing of the chicken. (sorry..... I know you were wanting to see that!) You simply place the chicken in the cone upside down, cut on each side of the neck and let it bleed out. After it was thoroughly bled out, I went ahead and cut the head off. I collected the blood in a bucket under the cone to be used for my apple trees. In this picture is the "dipping" of the chicken. We just hold by the legs and dip and swirl it around in the water. After about 30 seconds to one minute, the feathers will start coming out easy, then you know it's ready for plucking.


We worked fast, starting with the tail feathers then the wings. Those are the toughest feathers and we wanted to make sure we got those done first, before the bird cooled off. We did this part over newspaper so it will be easy clean up. We used new paper with each one.


After all those feathers were disposed of, we got out the cutting board and started the evisceration. Here Hailey is cutting off the oil gland. That goes first, because you don't want that to contaminate your meat.


Next is the crop. These birds didn't get there morning feed, but did free range, so there wasn't much in there.


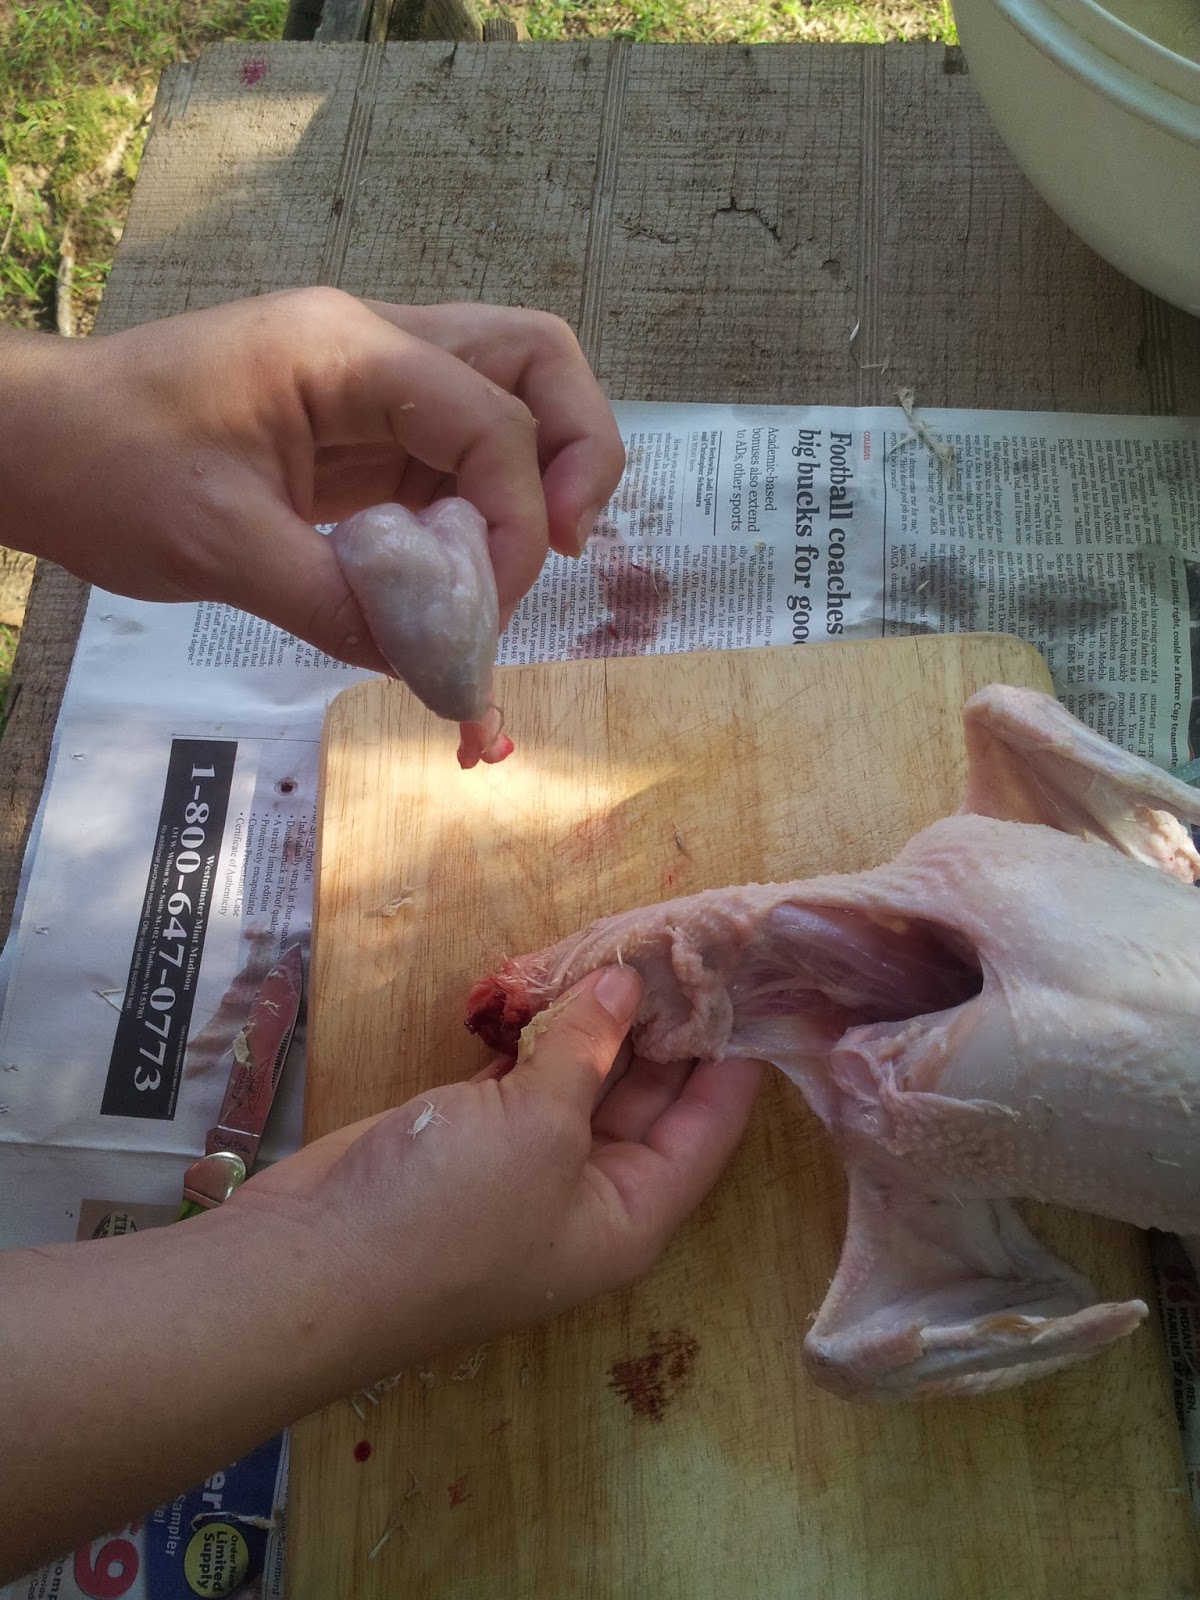
Then we cut a small slice in the skin at the bottom, then tore the skin apart. At this point, we reached inside with our hand and grabbed the, uh, all that stuff and put it in the evisceration bucket. We made sure we got everything out, especially the lungs. They can be hard to get out sometimes. It really wasn't messy or bloody at all.
 
 
The last thing is the feet. We just cut those off at the joint. With a sharp knife, you can slice right through.

 
The finished bird! I can't tell you how much it weighed because I don't have any scales, but I assume it weighs 2 1/2 -3 pounds. Somewhat small, but big enough. I cooked this bird that night. We had plenty with 2 pieces left over and it was very good! It wasn't a large bird with grotesque breasts and pumped full of steroids. This bird got to be a chicken. It free- ranged everyday, ate grass and was happy!
 
We kept the liver, heart and neck to be added to wonderful, homemade chicken stock. I also kept the feet because they make a wonderful broth also. I will detail that out in a different post.
 
We put 10 birds in the freezer for our future use with still more to butcher out. It makes me feel good  that we raised these chickens up from day old chicks, kept them healthy and happy, and was able to do it all ourselves.


Blessings,
Melissa


Friday, July 12, 2013

Blueberry jam


One of the easiest things to preserve in the summer is fruit.  All you really need is your fruit of choice and sugar. I never put pectin in my jam to make it thicker. I really feel it is a waste of money for jam. We like a runny jam, very spreadable, that's good on biscuits, pancakes or just about anything!
 
 
First, take your berries and wash them well. After a good rinse, place the berries in a large pot. You want to make sure your pot is large because you will be boiling the mixture and you don't want it to splatter out on you or your stove.


Pour all the berries in the pot, place over high heat and start the cooking process.  At the same time, I get the water bath canner going. You want the water really hot in the canner. Place it on high heat and put the lid on. Hopefully, it will get to boiling about the same time you will place your jars in it.

You can add a little water to the berries, to keep them from sticking if needed.  As soon as they start getting soupy, I start adding sugar. I add 2 cups to start.


Then, I start tasting. I keep adding sugar, one cup at a time, until it is as sweet as I like. With this batch, I added about 5 cups of sugar. I used about one gallon of berries. 
 
Your mixture should be boiling and you should be stirring. :)
 
 
You will start noticing foam forming along the top. Try to skim most of that off. A ladle works well for this. I don't worry too much if I don't get every bit off.
Let it cook until it starts getting thicker. This may take anywhere from 15 minutes to 30 minutes. Just remember that the finished product will be thicker, so you will have to judge for yourselves when it looks good to you.
 
When it finally gets exactly like you want it, it's time to fill the jars!
 
 
Fill each jar, leaving about 1 inch headspace.
 
 
Make sure you wipe the top of each jar with a clean, damp cloth. If you don't, it could prevent the lid from sealing.
 
 
Place a hot lid on top and secure with band. I keep my lids hot in a small pan of water on the back of the stove. If you haven't got a lid grabber like the one shown, GET YOU ONE! SOON! No more burning fingers. :) I do believe it is one of the most greatest of inventions.


Using your jar grabber, place in your canner very carefully. In the picture you may notice a towel. I placed it on the bottom to keep my jars from sitting right on the bottom. It works great. I do have an insert, but I thought I might have more jars than what would fit in it.
 
 
After all the jars are in the canner, bring back to boiling and boil 10 minutes. Use your jar grabber to remove the jars after the required time. They are hot so don't burn yourself. Place on a towel out of the way so they won't be disturbed for 24 hours.


The end product. Something wonderful made with a little time and effort! Canning and preserving is hard work, but is one of the most satisfying things a wife can do for her family. Especially when winter is upon us. There's nothing quite like opening a jar of "summer" in the freezing cold!
 
 
Happy canning!
\Melissa


Catching up

I can't believe my last post was in February! I seriously need to do some catching up!

Well, lots have been going on. We purchased our first dairy goats in April! We bought a Nubian/Boar mix doe, a Nubian buckling and 2 LaMancha bucklings. Yes, I know we don't need all these bucklings. I had in mind to later sell the LaManchas, but unfortunately we have lost them both to a predator.
After 2 weeks, I started letting the goats have grazing time on the pasture. Each afternoon, I would put them back in the farmyard. Things were going well until the first goat got gone, along with several chickens. We searched for hours looking for that goat. We never found a trace of him. I was upset to say the least.....

We lost the other LaMancha, but we did find part of his body. At that point we knew we where looking at a coyote, wild dog or a cat of some sort. Brad staked out in the woods for a couple hours, but It never came back because I guess it was too full on goat and chicken!
That same day, I walked to the Mulberry tree to try to get the last remaining berries and I saw fresh chicken feathers! I knew it was the feathers of my very favorite roo Roscoe. He was a Coronation Sussex given to me by a dear friend. Roscoe would follow me around a lot hoping I would toss him a bug or kitchen scraps. I really miss him and now wish I had been more aggressive on breeding him to my best hen. :(

We were given 2 female rabbits by some friends of ours. We have been wanting to start raising rabbits as another meat source. Several weeks ago, while we were at the covered bridge having our weekly get together with friends, Hailey caught a rabbit! It ended up being very tame and was obviously somebodys "Easter" bunny. Who ever owned it probably got tired of it and let it go. Well, that rabbit ended up being a boy! Now we are in business!
We bred one of our females to him and just this Monday she had her first litter of 6! They are not kidding when they say 31 days is all it takes! She seems to be a great first time mother and hasn't eaten a single one of her babies which we've read they are prone to do if they don't have enough protein in their diet. We are very happy raising rabbits because of the easy car of them. More on this later because we are learning a lot!

Well, I just wanted to drop in and say hello and to let you know we are still here. Just very busy. We are now in the middle of summer and everything is growing fast and having babies. Yesterday, our duck hatched out her first duckling! Cute!

Today, I am "putting by" blueberry jam, blueberry syrup, pickle relish and tomatoes. Busy, busy, busy.......

Blessings,
Melissa